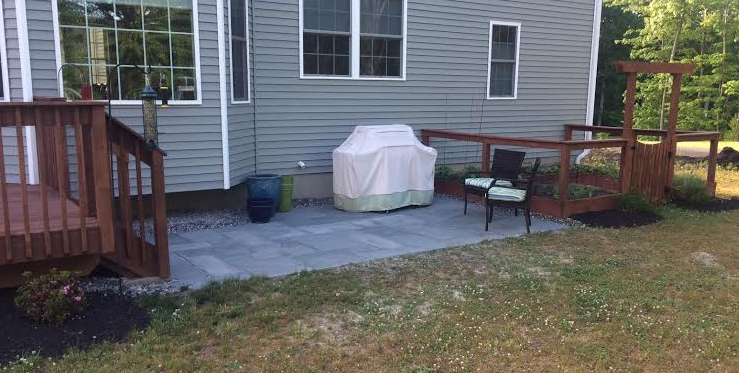
After the completion of our vegetable garden, we decided to fill the area between the garden and our deck with a stone patio. Once again, we were cursed by beautiful images of blue stone work on pinterest and Houzz. This project grossly exceeded my construction expectations by about a factor of five – it wasn’t hard labor, it was mind-numbing frustration rooted around an unexpected necessity for precision.
Online resources are pretty helpful for patio construction. The steps are straightforward:
1. Dig
2. Gravel/Level everything
3. Compact
4. Put down sand
5. Place stones
6. Joint sand
These steps surprisingly don’t mention headaches or re-doing work multiple times. Both these items should probably be in there.
We decided on a 150 square foot area. At a local quarry we ordered all our materials. The folks there did the quantity calculations for us. The trickiest part was picking out the type of stone. As we walked the lot we found a beautiful cut stone that was consistently 1 inch thickness.
us: “Ooh! we like this one!”
Store guy: “of course you do. It’s the most expensive of the ones we’ve looked at”
Geesh.
Almost all of a patio’s cost comes in form of the stone and transportation fees. Take the sand for example $22/ton. We got one ton. No big deal! The stones cost anywhere from $4ish per square foot to $12ish per square foot. Ours ended up being about $8.00.
$1200 in stone
$250 for delivery fees
$100 for processed gravel
$65 for a compactor
$60 for joint sand
$22 for sand
Total cost: $1697
Quotes for having a similar patio done for us came in at about $4000. Worth the work? Maybe.
PLANNING
We planned aggressively. I measured out the plot and put in stakes with strings so we could define the area. I left about three inches gap on two of the sides in case the stone dimensional tolerance was poor (it was).
Annoyance level: low
Three inches was enough on two of the sides, I wished I’d given myself an extra inch on the other two sides. It worked out fine, but could have been a bit easier.
Meanwhile, Jen put together a stone design based on the options available from the quarry. We used excel.

ta-da!
We ordered only those stones we needed. This is the only way I’d ever recommend doing a patio.
Annoyance level: medium
We are NOT stone layout experts. It took about five iterations before we couldn’t find any obvious flaws.
DIGGING
I figured the digging part would be the hardest. Nay. That was the easiest. In general websites everywhere recommend at least 4 inches of gravel (or processed gravel), one inch of sand, and then your stone. With one inch stones that meant I needed to dig down 6inches. Sander came over to help and the whole thing was dug out in about 3 hours.
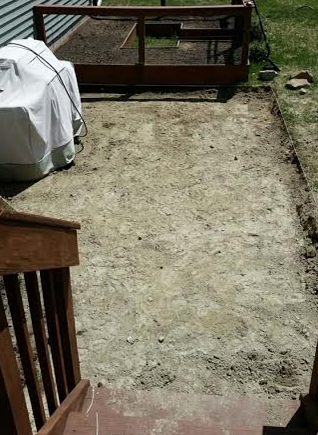
We lucked out here. That “At least” 4 inches of gravel depends on the quality of the earth under your sod. We had a clay-like sand which is PERFECT. If you have 10 inches of fluffly top-soil you’ll have to go deeper than 4 inches.
We also didn’t have too many rocks. Those that we did have we were able to get around. Overall, this really wasn’t too bad.
Annoyance level: medium-low
Don’t forget to find a place to put the dirt you dig out. It adds up really quickly. Thankfully, part of my yard needed some leveling, so we had a place to dump.
GRAVEL/LEVEL EVERYTHING
THIS IS THE WORST.
Websites recommend using line levels attached to stakes. I was lucky enough to be able to borrow a transit. Still, this was WAY harder than I expected.
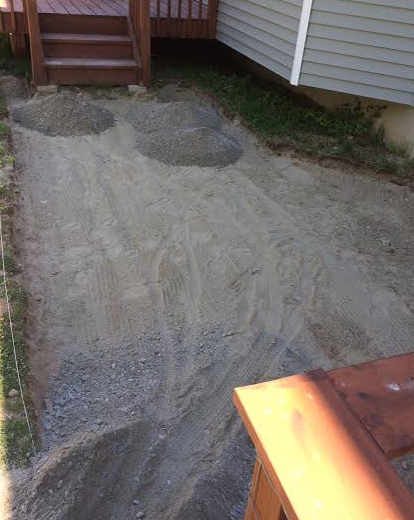
The “gravel” isn’t really gravel. We used processed stone which was about half sand and half tiny rocks. It worked like a charm. For drainage, you’re suppose to have 1″ of slope for every 10 feet of patio. Our patio was 10 feet wide so the math was simple. Getting the ground equally sloped? Brutal.
I ended up getting a two by four and dragging it all over the place to try and level out the tiny hills and valleys made after compacting. It was strenuous and challenging. Even when everything looked perfect I’d find half inch variances like you wouldn’t believe. Finally, I got close enough that I was happy and moved to the next step only to realize that the stones would rest too low. The point where I had my transit happened to be a low spot in the lawn. I had to add another 1/2. UGH!
I’d plan on having your stones extend about a quarter inch ABOVE the grass. That would make life easier. Even after raising the bed, I ended up a quarter inch lower than I should have been.
Annoyance level: HIGH
That stupid leveling was the worst. I hated it.

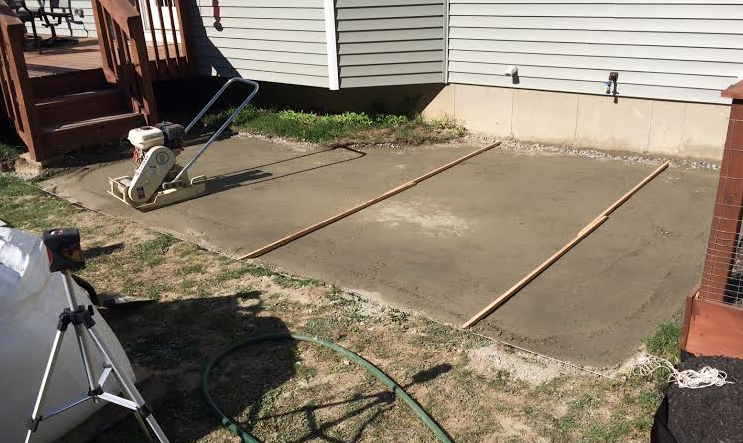
Using the compactor was fun and not particularly hard. It required some muscle to move the thing in any direction other than forward, but otherwise was a very convenient certainly worth the rental fee (FUN FACT: we rented on a Saturday. Because the place was closed on Sunday and Memorial Day we got three days for the price of one. Much needed considering the project felt like it never ended)
ADDING SAND
and
PLACING STONES!
This was yet another step I thought would be easy that definitely wasn’t. Everyone recommends using two pieces of conduit and a 2×4 to level out the sand at a very perfect 1 inch. I used wooden stakes instead – it worked but was occasionally annoying. Don’t skimp, get conduit.
You gotta go sector by sector. Put some sand, level the sand, place the stones.
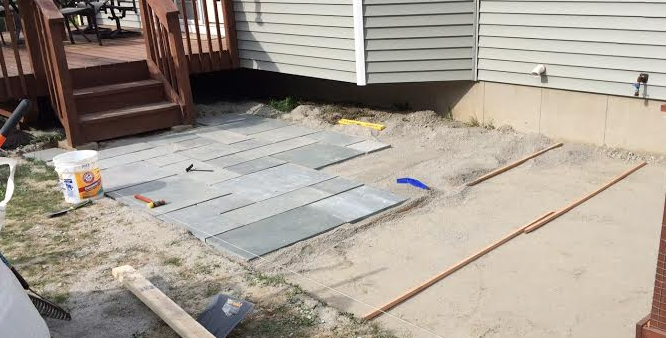
The problem is that the stones aren’t perfectly sized so every single one has to be leveled and shimmied and adjusted and knocked and adjusted and shimmied. What I thought would be a drop and stop sort of event turned out to be stupidly maddening.
My favorite was the stone that took 20 minutes to place and get level; and then (of course) I realized I had it oriented incorrectly. SO DUMB.

Tools used for stone placement:
Level
Wide spackle knife
Rubber mallet
Spade
The placing of the stones took a solid 4-5 hrs.

Filling the Joints
We bought polymetric sand to fill the joints between the stones. The sand works in a fairly simple manner:
1. Put in the cracks
2. Wet
3. Let sit
Success!
BUT WAIT! there is a very small caveat: after you put the sand in the cracks but before you wet it? You need to make sure there isn’t any sand on top of the stones. This is NOT EASY. I used a shop vac and spent two hours all leaned over with a crooked back cursing my existence.
Honestly? There’s probably an easier way to do this. I most certainly did it wrong.

Annoyance Level: Really high. Oh man, my back hurts thinking about this.
Overall, I’m stoked to have constructed our patio. It will get great usage as an epicenter for grilling and chilling out. I’m pleased and if I had to do it again, I’d probably do it myself – though if there’s a next time I will plan a solid four days for the work.
Looks great! We’re doing a patio this summer but we are going the call people and hand over the cash route.
Pingback:Long Flights vs. Short Flights |