The Schenk introduced me to the world of silk screening and I’ve found that very few people understand how it works. So here’s a quick how to for silk screening.
What you’ll need:
1. A Screen, of the silk screening variety (super fine thin holes)
2. Ink (textile inks for tees)
3. A squeegee
4. Light sensitive chemicals
5. A fan
6. A photoflood light bulb (BBA #1. Apparently black light bulbs work too) in a large light mount
7. Masking tape
8. Laser printer and transparencies
9. Toothbrush
10. Screen filler
Step 1:
Apply some masking tape around the edges of both sides of your screen.
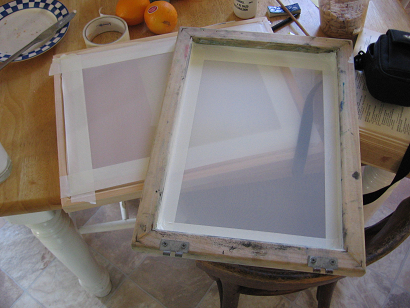
This is mainly to prevent the ink from getting between the frame and the screen and ruining your equipment.
Also, print out your design on a transparency with a laser printer. Once printed, hold it up to the light to ensure that your design is completely opaque!! you may have to run it through the printer a few times.
Step 2:
Find yourself a darkish room. Take the light sensitive chemicals and spread them on the screen with your squeegee. After you add some to one side, flip it over and add a little to the other side. Squeegee both sides until you feel the emulsion is consistent along the entire screen.
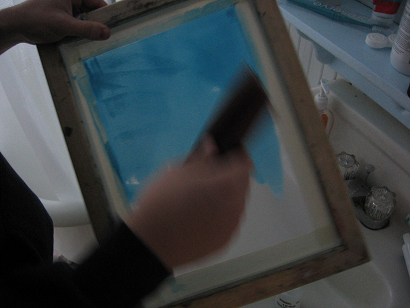
Many stores sell this type of light sensitive emulsion, but oftentimes you must add a light sensitizing agent first. Add it all, and mix well before application!
Step 3:
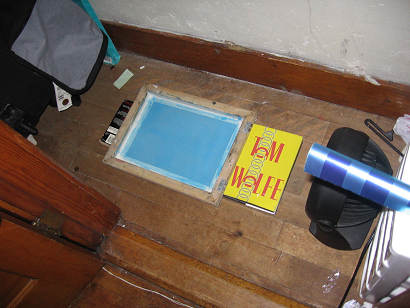
Prop your screen off the ground with a few books in front of a fan (on medium), in a SUPER dark room, and let it sit for an hour.
In the picture below, i was stupid because I used a flash during a light sensitive process. My idiocy is your gain because you can see the process better.
Meanwhile….
Step 4:
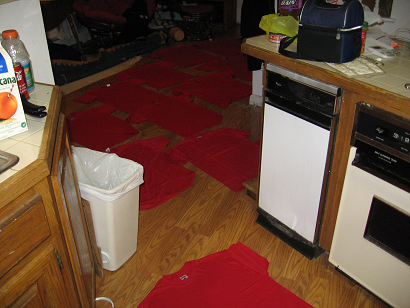
Lay out your shirts, canvas, posters, whatever… lay them so that they obnoxiously take up every inch of floor space in your kichen, foyer, everywhere.
Step 5:
After an hour, enter the dark room and touch the screen. If it’s dry to the touch, you’re good to go. While in the dark, place your transparency on the screen. Depending on which side of the screen you put the transparency on, you’ll want to put it so that it reads frontwards or backwards. Think about how you’ll ink your final product before you do this step to make sure you do it right.
Center your light mount 24 inches above the screen.
Turn on the light and Blast the screen!
At this point the light from the photobulb is hardening the light sensitive chemicals. But the ink on the transparency is preventing the light from hitting the chemicals directly beneath your design so that ink will remain somewhat liquid while the rest of the screen hardens.
Step 6:
After 12 minutes, your screen should be ready. Turn off your lightbulb and remove your transparency. You should be able to see a significant difference in color between the chemicals that were under the ink and that which was exposed to the light.
While still in low light, retreat to a bathroom and put your screen under a stead cold water stream. Using a toothbrush or nylon brush, scrub the surface gently to remove the emulsion from the still liquid spots. As you scrub under the cold water the chemicals that were not hardened will come out of the screen… revealing your beautiful design! You now have a perfect crisp stencil!
Step 7:
Let the screen dry. Maybe in front of a fan.
Step 8:
Hold the screen up to a bright light and make sure that you don’t have any pinholes of light shining through the emulsion. If you do, you’ll have to paint a little screen filler (with a paintbrush) over those spots. If this is the case, let it dry for 10 minutes after painting that additional screen.
Step 9:
Put your game face on.
It’s printing time.
Step 10:
Lay the screen down on your canvas. Using a spoon, spoon a hefty blob of ink on one side and then, while pushing forcefully down on the screen, squeegee the ink across… once… twice… three times.
Schenk has informed me that the first pass is called the flood pass. It doesn’t really put any ink on the paper, it just populates the screen cells with ink. SO… after you ink the first object, you only need to squeegee twice on all subsequent screenings.

Step 11:
Unfortunately, you’re not done. The ink dries fast, so if you want to save your screen, you’re going to have to also act fast.
Once all inking is complete, get yourself to a tub or large water basin. Turn on some hot water and flush the ink out!
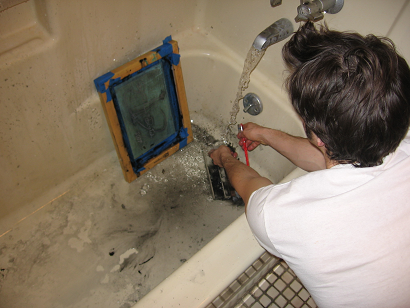
Once the ink is out soak the screen in some bleach and water and scrub with a toothbrush or nylon brush. The emulsion will come out and you’ll be left with a clean screen ready for future printings!!
Step 12:
If you’re printing on t-shirts, let the ink dry for at least 15 minutes. Then, throw the shirts in the dryer. The heat from the dryer will set the paint and your shirt will last forever.
Ryan uses the dryer move. Drew actually puts his screened shirts in the oven for a few minutes.
And that’s about it! you can get most of this gear at your local art store. If you have questions about the process, feel free to fire me an e-mail at: mikedidonato AT gmail DOT com
I used to silk screen all the time during high school. I haven’t done it in about 6 years though. It’s good fun though.
Nice tutorial, and far less intimidating that most of the other online sources. I’ve been thinking about trying this for while now. I just may.
Do it!
if you need help, fire me an e-mail. Perhaps I would be able to assist you.
I was thinking about using a non-photoreactive filter, just using a stencil or something. That could make things (slightly) easier.
Anyone know how spraypaint holds up in the world of t-shirt decoration?
I want a tshirt printing machine to handle the inking part. that would be hot.
it would also be awesome if it sounded like factories do in old cartoons…
Poorly. Do you really want god-knows-what nasty chemicals in enamel spray paint against your skin all day long? I certainly don’t. :)
Plus the force of the spray paint will lift up the stencil and leave you with a fuzzy print. And you have to make bridges between all the blocked out parts. And you have to cut out the stencil with a knife. And if you’re doing more than one shirt, silk screening will be much faster. (I’m a spraypaint hater).
They do make machines that allow you to register multiple colors on one t-shirt. Some of them are pneumatically-driven, too, and they really do sound like an old factory!
They make a combo of stuff called Drawing Fluid and Screen Filler. Drawing fuild is neat because it washes out with cold water, while screen filler requires a solvent like a household cleaner to rinse it out. It is a little less intimidating than the photo emulsion method, if you’d like to try it out…there are less steps, and much less to go wrong.
The basic idea is that you paint on a positive of your image with the drawing fluid, then smear screen filler all over the entire screen (a la step 2 above), let everything dry, then rinse the screen with cold water. The parts of the screen that had been previously blocked out with the drawing fuild (where you painted) will rinse right out, and you have a great stencil!
I have done hand-lettering like this, and the neat part is that you can get a little abstract exressionist and fling the drawing fluid around and splatter it. It looks cool. But unfortunately my Illustrator skills are far superior to my actual drawing skills, so I almost always use the photo emulsion method.
Re: Step 4 – if you were doing posters, you wouldn’t need to lie them all out for printing, just mount the screen on hinges. Although you would still have to find a place to lay them all out for drying!
Speaking of good fun, Chris Puma and I almost burned down Trowbridge house with a silk screening experiment gone horribly wrong. Hint: don’t use plexiglass to hold the transparency against the screen…it melts at a much lower temperature than glass…
I was kidding. But thanks for the info. I’m more of a thinker than a doer. Plus I don’t have the time or space for the project. I do admire those of you who actually do something with your thoughts other than thinking them.